


General M.250 FAQ
Find answers to your most burning questions about the M.250 Hex Drive Toolkit.
The screwdriver bits are tight in my tool - how do I get them out?
The rubber we use in our locking system may come a bit tight out of the box, so you'll need to remove and re-insert the bits a few times to loosen it up. Just take them all out - see the M.250 functions explained section below - and put them in a few times to reduce the grip a little.
What sized screwdriver bits does the M.250 use?
The M.250 uses 1/4" Hex shank tool bits.
What material is the M.250 made of?
The M.250 is built using an engineering-grade glass-reinforced composite. This material has a very high glass-to-polymer ratio (70%), making it incredibly tough, and weighs in 40% lighter than titanium.
How strong is the screwdriver socket?
The front screwdriver socket of the M.250 is reinforced with a steel collar, and can withstand up to 10Nm of torque.
Why are there 2 empty tool bit slots?
We've left two empty slots for your own tool bits. If you have specific screwdriver bits for your job or hobby, just slot them in and you're set to go.
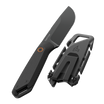
How do I get the M.250 out of it's holster?
There's a bit of a trick to it, so check out the M.250 functions explained section below.
I lost my screwdriver bits! Where can I get replacements?
Since we only use standard 1/4" tool bits, you can pick up replacements at any good hardware store. The M.250 will comfortably hold any tool bits that are 1" (25mm) long.
M.250 Functions explained
In this section, we'll go into detail how each function of the M.250 works.
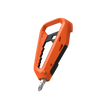
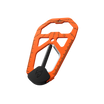
Removing the M.250 from it's case
There's a bit of a trick to it, but once you understand it's easy. Just brace your thumb against the top of the holster, and press up with your fingers from beneath. The M.250 is locked in place by two small tabs, so you should hear a click as it unlocks.
To re-insert it, just push it back into the holster until you hear a click.

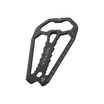
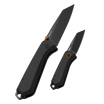
Removing tool bits from the M.250
To take out a tool bit, just rest your thumb on the side and push. You might find better leverage on the "shoulder", where the hexagonal body transitions to the screwdriver bit.

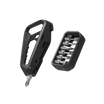
Removing tool bits and using the screwdriver
First, remove the extender with your finger (image 1). Fit your fingernail into the small notch if you need more grip.
Then, turn the M.250 around to access the screwdriver socket (image 2). Insert the extender.
Remove a tool bit (image 3, as explained in the instructions above), and insert it into the extender (image 4). You're ready to go!
Alternatively, if you don't need an extender, you can just insert the tool bit into the socket from step 2.

Belt Clip
Just lineup your holster with your belt or pocket and slide it over.

Magnetic retention
If you want to mount your M.250 on a cupboard, shelf or fridge, the magnet on the side of the holster will hold it in place.
Just insert it into the holster, and hold it up to connect.
